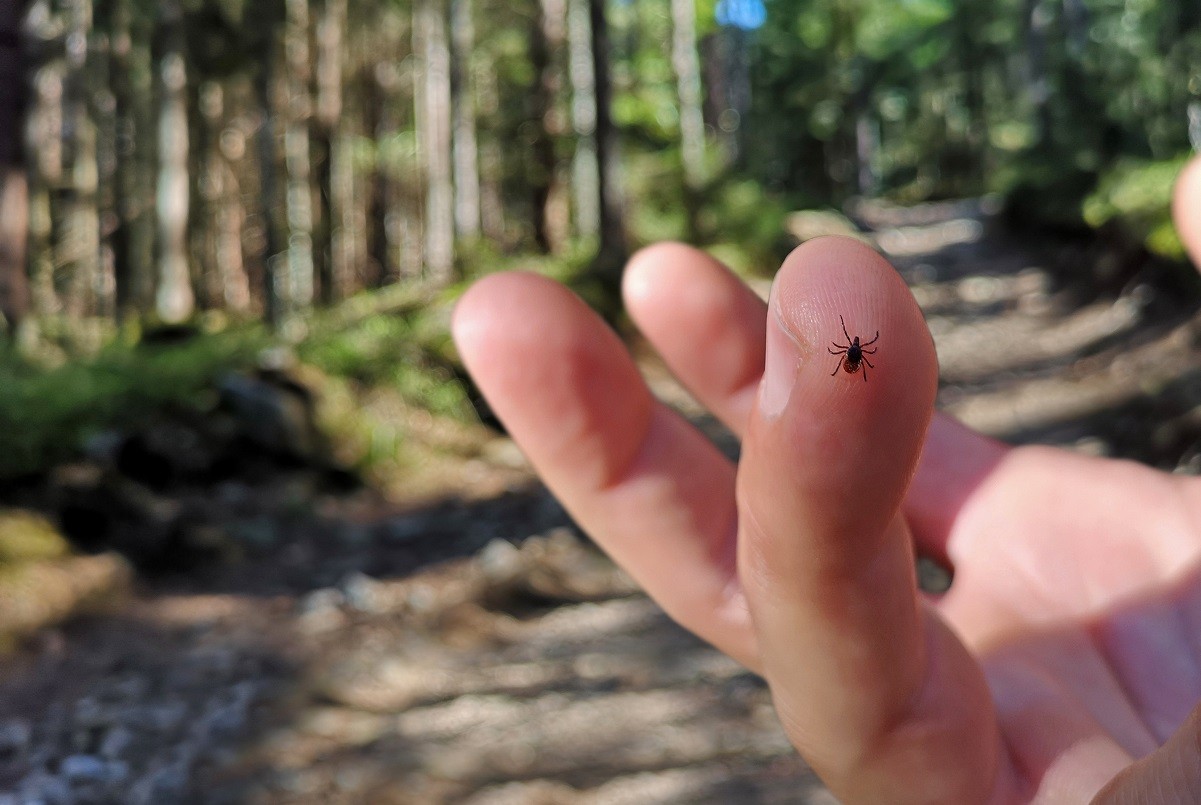
For most of the country, ticks are a threat to health and outdoor living spaces from March to October. Unfortunately, in certain areas such as the western and southern states, ticks are a problem throughout the year. Why should you care? These real-life vampires are known to transmit some serious diseases, including Lyme disease and Rocky Mountain spotted fever. That’s why it’s imperative to make sure your property is a “tick-safe” zone. We reached out to PestWorld.org, who provided us with these easy tips to keep ticks out of your yard and away from your family members, furry or otherwise.
1. Keep your yard maintained.
Ticks love tall grass. They quest by holding on to the top of a grass blade with their back legs and sticking out their front legs. As a potential host passes by, the tick can grab onto the person’s pant leg or their dog’s fur before eventually attaching to a host.
To help keep ticks out of your yard, maintain your property. Cut your grass regularly to keep it short. Remove “leaf litter” and brush from around your home and yard. Since ticks prefer leaf litter and wooded areas, create a three-foot barrier of gravel, wood chips, or mulch between your grassy areas and tick-prone areas.
Also, trim branches around your property’s edge to bring in more sunlight. (Sunny areas are less likely to have ticks.) Finally, groundcover vegetation provides a habitable area for ticks, so keep this type of vegetation to a minimum.
2. Deter animals from coming into your yard.
Remove leaf litter.
Ticks live on their hosts, such as deer, raccoons, and even stray dogs. (The “blacklegged tick” is known as the “deer tick” or the “bear tick” for a reason!) Some experts estimate that more than 1,000 ticks can live on deer. However, small animals, such as mice, chipmunks, and shrews, are more likely to carry ticks that can transmit Lyme disease. Make sure to keep these tiny creatures out of your yard and home.
These easy tips can aid in your tick control efforts:
Remove woodpiles and leaf litter, which mice can use as nesting areas.
Keep your garbage cans tightly closed to discourage opossums, raccoons, and skunks from coming into your yard for food.
Remove any excess debris or items, such as old furniture, mattresses, or trash from your yard.
Avoid hanging bird feeders as deer mice like to eat on bird feed.
Install a chimney screen to keep squirrels, racoons, and birds out of your home.
Inside your home, store food in airtight containers and clean up crumbs immediately.
Keep firewood away from your home and on a dry, raised surface.
Include flowers and plants that repel ticks (or animals that play host to ticks) in your yard and garden. Such plants include rosemary, garlic, lavender, mint, lemongrass, marigolds, chrysanthemums, daffodils, and sage.
If possible, install an eight-foot fence around your property to keep wayward animals out of it.
3. Keep potential “hosts” away from wooded areas.
Most ticks are located within three yards of the lawn’s edge, usually along woodlands, stonewalls, and ornamental plantings. Set up your yard to keep ticks away from your outdoor living spaces.
Keep playground equipment, decks, and patios away from your yard’s edges and trees, and in the sunlight. Check any outdoor furniture frequently for ticks and pests that carry ticks, such as mice. Also, limit pet activity around the edge of your yard, so your furry friends don’t pick up any hitchhiking ticks.
4. Call a pest control specialist.
If you can’t prevent a tick infestation, then you may look for tick treatments for your yard. If that’s the case, then contact a professional pest control specialist. There are several acaricides (since ticks are arachnids) that can help to kill ticks in your yard or stop ticks from getting to your yard in the first place.
Unfortunately, certain acaricides can be dangerous to the environment, wildlife, beneficial insects, and of course, you. Talk to a professional, voice any concerns you may have, and then decide on the right course of action for your family and yard.
Stay on top of home maintenance
Homeownership can be hard, but it doesn’t have to be. The vipHome.app can help. In less than four minutes, enjoy a new way to manage your home. Simply download the app, register your home, and enjoy a simplified homeownership experience.
Do you have more than three computers in your home? According to the Cybersecurity & Infrastructure Security Agency, one of those computers has malware on it. Almost half of all American adults (47%) have had their personal information exposed by cyber criminals, and 600,000 Facebook accounts are hacked daily.
How can you keep your family and information safe when surfing the internet at home?
“It’s not as complicated as some of us can make it out to be,” says Lisa Plaggemier, executive director of the National Cybersecurity Alliance (NCA). “The worst thing you can do is nothing.”
Lisa recently shared with us important home internet safety tips every homeowner needs to know (including you)!
To connect or not to connect?
Most households are now running an entire network of devices that are all linked to the internet. Before purchasing your next device or even start on your smart home journey, consider if you really need that smart toaster.
“I don’t have anything that doesn’t absolutely positively need to be connected because there’s an old phrase in cybersecurity,” says Lisa, who has headed the NCA for more than four years. “If it’s connected, it’s hackable.”
Even smart lights come with security risks and have been used to plant malware.
While many smart home devices help with energy efficiency and convenience – thermostats, TVs, lights, cameras, locks – they also come with risks to our privacy and security.
“We’re very quick as a society to trade off convenience for those other things,” says Lisa. “In most cases, we don’t understand the tradeoff we’re making and the role we play in making sure that our security and our privacy are protected.”
Top home internet safety tips
Change your router’s default name and password.
A few quick tips you can do to protect your information and privacy include:
1. Change your default router name and password.
“Don’t use the name of your router or the password that it came with,” says Lisa. “There are default passwords on routers when you take them out of the box, and unfortunately, you can Google those. They’re very easy to find online.”
2. Keep your devices’ software up to date.
“A lot of those updates include security fixes known as patches,” says Lisa, “so it’s really, really important to run those.”
NCA recommends homeowners set up automatic updates, so homeowners don’t hit “remind me later” and miss an important update. If you can’t set a device to update automatically, then complete the updates your device notifies you.
“My device flashes color when there’s new updates,” says Lisa.
3. Set up a guest network.
“You should have a network for your family and then a guest network for guests,” says Lisa. “Then you can also use the guest network for all those devices that we talk about – the Internet of Things devices or IoT devices.”
This way, your private information – banking, home insurance, emails, etc. – stays private.
If you work from home, use your guest network for work-related business and use your company’s VPN to secure the connection.
4. Use VPN when away from your private network.
Virtual private networks (VPNs) are generally used for remote work as they provide the same protections to workers and computers at home that are provided in the office on the corporate network. They are also great for personal use.
“I like VPNs for personal use as well, especially if you are not at home and you’re in a hotel or at a coffee shop,” says Lisa. “They’re a lot more affordable than they used to be for individuals.”
Read before changing your passwords!
Make sure your passwords are strong.
The advice on passwords has changed over the last couple of years. Many organizations used to encourage people (and employees) to change passwords every 60 days or so. That’s not the case anymore.
“The National Institute of Science and Technology discovered that [recommendation] led to a whole bunch of bad habits,” says Lisa. “We started using patterns like just changing a few numbers or letters but using the same core password.”
This makes it easy for hackers to use software to crack those passwords by working through iterations. If even one password is stolen in a breach, more than one account could be vulnerable.
Today, you may be able to keep your password indefinitely if you complete the following simple steps.
1. Use complex passwords and multifactor authentication (MFA) for every single account.
Keep your account as safe as possible.
“If your passwords are long and complex and you’ve secured the account with MFA, then you don’t need to worry about changing the password,” says Lisa.
Since there have been so many data breaches and many of us use the same password for multiple accounts, MFA can help to keep your information safe.
Explains Lisa, “MFA means that if somebody has your password or a version of your password, they can’t get into your account with just that password alone unless they also have access to your phone or your computer.”
NCA recommends authenticator apps with facial recognition.
“I find the authenticator apps incredibly easy to use if you have facial recognition on your phone,” says Lisa. “You get that push notification. All you have to do is look at your phone and boom, that’s it. You’re into your account.”
2. Use password managers.
“Even though there’s some bad press on those lately, we’re still fans of password managers,” says Lisa.
You may wonder about the safety of a password manager since many people assume they are “putting all their eggs in one basket.” However, password managers are very secure. All you have to do is keep track of the password for the password manager, and it remembers everything else.
“It can also think of a long complex password for a new account a lot faster than I can,” says Lisa, “and it can type my credentials a lot faster than I can.”
Password managers also make it easier and safer to share passwords, especially with family members.
“We all text passwords to each other. We have emailed passwords to each other. All these things are much less secure than a password manager,” says Lisa.
3. Log out of accounts.
“If a device isn’t powered up and not connected to the internet, it can’t be accessed,” says Lisa. “I’ll say the same for your online accounts. If you’re not logged into them all the time, it’s a lot harder for somebody else to break into that account.”
4. Only give access to data when necessary.
Only give your apps the information they need.
“A rule of thumb as far as security and privacy settings go – you should give [apps] access only to the data that they need to provide the service or convenience to you,” says Lisa.
One such example is OpenTable, which is an app used to find local places to eat and make restaurant reservations.
“Clearly, OpenTable needs access to my location data on my phone,” says Lisa. “It doesn’t need access to things like my photos or my contacts.”
However, when people are hungry and downloading the app for the first time, they may accept certain settings without reading the terms and conditions. App users need to change their mindset and prioritize their privacy with apps.
“Just enough data and not a bite more,” says Lisa. “That’s a good way to think about it.”
You’ll also need to be conscious to setting changes and terms and conditions updates.
“Settings that we configured six months ago might have gotten reconfigured in the process of running updates without us realizing what was going on,” says Lisa.
It’s a good habit to check your privacy updates on a routine basis (monthly or quarterly) and see what changes have been made. Sometimes, these settings and terms and conditions may be difficult to find, which is why staysafeonline.org created a list of these for social media and other frequently used websites.
Where to keep your home information
As mentioned earlier, your phone and your email are not secure, and even your photos can easily be compromised. Random apps may have access to the information on your phone, and you do not want your homeowners insurance or other important documents available to hackers.
“In our house, we keep the originals in a bank safe deposit box,” says Lisa, “and then we keep scanned copies in the cloud.”
Keep your home documents in a secure digital location.
This is especially important in the event of a home disaster, such as a fire or terrible flood.
“If you think about the worst-case scenario, you need to be able to access these documents,” says Lisa. “What if it were the beginning of a three-day weekend holiday and the banks are closed until Tuesday? That’s why I say don’t just keep a paper copy in the safe deposit box.”
Keeping scanned copies in the cloud can help you get access to your documents with a simple computer or device and an internet connection.
Where and how to start your home internet safety efforts
The important thing is to start, and an easy place to begin is with a password manager. First, pick one after completing research. (Tom’s Guide and Consumer Reports have reviews on password managers.) Then, start small.
“You don’t have to put all your passwords in there at once or change all your passwords on everything all at once,” says Lisa. “Load in your most important accounts, like your financial services accounts, your homeowner’s insurance, etc.”
Once you install the manager on your browser, it will ask you if you want to add different accounts that you visit as you visit them. If you’re using the same password in multiple places, it will prompt you to change that. If you’re using passwords that are too weak, it will prompt you to change those as well.
“Don’t be intimidated,” says Lisa, “Just start somewhere, and you’ll see how easy it can be.”
Keep your home information secure
Download the app today!
Between hurricanes, home fires, and hackers, you need some place to secure your home information. The vipHome.app can help! Our home management app gives you one secure place to store all your home documents and receipts, and our servers are HIPAA-compliant. So you know your information is safe.
In less than four minutes, you can download the app, claim your home, and enjoy a simplified homeownership experience.
Electric vehicles (EV) are quickly becoming mainstream. According to the Argonne National Laboratory, more than 3.4 million EVs are on American roads today, and they are expected to make up more than 50% of new vehicle sales by 2030. For many Americans, this may mean less time at the gas station and more time at the garage outlet.
What does this mean for the safety of your home (and your bank account)? We reached out to Sarah Ollila, program manager for the Vehicle Technologies Office (VTO) of the Department of Energy. Sarah answered six of the top questions homeowners have about EV chargers at home and how to stay safe while using one.
Are all EV chargers the same?
The short answer is no. There are three types of EV chargers: Level 1, Level 2, and DC Fast Charging (or Level 3).
Level 1 charger
The first type, a Level 1 charger, is the most common EV car charger.
“Most, if not all, EVs come with a Level 1 charging cord, which plugs directly into a normal, 120-volt wall outlet,” says Sarah, who has been with the DOE for more than eight years. “It’s just like charging your phone.”
Level 1 chargers replenish an EV’s battery at a rate of five miles per hour of charging in a 120-volt outlet.
“If you charge for eight hours overnight, that would be about 40 miles of electric range for a standard mid-size EV,” says Sarah. “If you want to get more charging in during that time, you could use what they call a Level 2 charger.”
Level 2 charger
Consider installing a Level 2 charger in your home.
Level 2 EV chargers are best known as the ones in the charging stations you see in your local grocery store or strip mall parking lot. This type of charger typically yields 25 miles per hour of charging and requires professional installation and a 240-volt outlet (the same outlet as a clothes dryer). Sometimes, upgrades to a home’s electrical system are needed prior to installation.
DC Fast charging station
A third type of EV charger, a “DC Fast Charging” equipment or Level 3 EV charger, can have a power output over 350kW, allowing it to charge a standard electrical car in 60 minutes or less. Currently, there are just under 7,000 of public stations across the U.S. At this time, DC chargers cannot easily be installed in homes and would require expensive structural upgrades, upwards of $50,000, to complete.
Please note: Tesla vehicles require an adapter to connect to non-Tesla charging stations. (These are generally provided at time of purchase.) Likewise, non-Tesla cars need an adapter to use Level 1 or 2 Tesla charging stations; however, non-Tesla cars cannot use Tesla Superchargers (or Tesla Level 3 EV chargers).
How do you know which EV charger is right for you?
“Some people are surprised to find that the average vehicle miles traveled per day is actually fairly low,” says Sarah, who helps to accelerate the development of clean transportation solutions. “To go to work, to the grocery store, and to drop the kids off at school is probably going to be less than 40 miles a day.”
If you and your family travel further or you have a longer commute, you may need to upgrade to a Level 2 charger.
Do you really save money on transportation costs with an EV?
With gasoline prices still lingering above $3 a gallon in most parts of the U.S., the price of electric car charging is much cheaper.
“It depends on the electricity costs of where you’re located,” says Sarah, as utility rates vary from state to state, “but one of the nice things about charging at home is that you take advantage of lower over-night electric rates.”
These rates average 16 cents a kilowatt-hour (kW), which means a full-charge of an EV battery costs around $15. A 12-gallon tank of gas in the U.S. is about $41 (currently).
“It’s considerably less expensive than refilling your fuel tank with gasoline,” says Sarah.
Also, more than 25% of public EV charging stations are free to use, according to the Alternative Fuels Data Center. Of course, the purchase price of an EV can be significantly higher than a gas-powered vehicle, and Level 2 EV chargers have upfront and installation costs, too.
Before you buy an EV or install a Level 2 charger, research federal, state, and utility incentives. You may be surprised by offers that may help bring down the costs of both the purchase of an EV and the installation of Level 2 charger.
How hard is it to install a Level 2 charger for home?
Some EV chargers come with apps!
Getting an EV home charger installed can be completed in the following five steps:
Determine where you’d like the charger installed.
Hire a professional electrician with experience in EV charger installation.
Obtain the necessary permits. (Your electrician should be able to help with this.)
Schedule installation.
Have the EV home charger installed.
Most Level 2 chargers are installed in a garage, but they can also be installed outside your home.
“If you’re going to do an outdoor installation, think about where you want to park relative to the outlet,” says Sarah.
Some Level 2 chargers sit on a pedestal while some attach to the wall. All have standard safety features, including being UL-certified. Some have advanced features, such as data collection and expansive user displays.
As mentioned earlier, charging an EV at home with a Level 2 charger requires a 240-volt system. Most homes already have this system since dryers and electric stoves require them, but you may need to have that outlet installed where you park (and charge) your car. The DOE recommends using a licensed electrician to install the 240-volt outlet and the charger itself.
“There are different types of outlet prong configurations that you can get,” says Sarah, “so you do need to make sure that the outlet you install matches the charger you purchased. An electrician can help do that.”
One of the best ways to find an electrician who specializes in EV charger installation is to contact your EV dealer.
“Manufacturers and dealerships are starting to get more involved,” says Sarah. “It’s possible some of them might even offer charger installation as an incentive to purchase an EV.”
Your local building authorities may require a permit, and while your professional electrician should be able to help, you can learn more about the codes and standards on the Alternative Fuels Data Center website.
What do you need to know to charge your car at home?
Once you have your EV or new charging station, you’ll want to make sure you’re charging safely. Before you plug in your car, here are answers to frequently asked questions that Sarah sees at the VTO:
When using a Level 1 charger, use a GFCI outlet to charge.
Car orientation and surface level (such as a flat surface) matter little.
Charging in the rain is just as safe as charging in dry weather.
Be mindful of where you place the cord, so no one trips over it.
If it’s not safe to charge, the EV and the charger will not allow a charging session to start.
If charging doesn’t start, it could be that the cord has been damaged, or there’s a short in the electrical circuit. Homeowners should be able to troubleshoot the situation easily.
“Many Level 2 chargers have displays or indicator lights that will give you some indication of where the error is, whether it’s on the vehicle or charger side,” says Sarah.
Depending on the reading, you can either reach out to the charger retailer or the dealer for a repair or replacement of that equipment.
Is there any maintenance required for EV chargers at home?
The good news is – home EV chargers require minimal maintenance.
“It mainly includes storing the charging cables securely, checking the parts periodically, and making sure that you haven’t run it over with a lawnmower,” says Sarah.
Homeowners should also keep the equipment clean by wiping it down every so often.
While the idea of plugging in a car may be new, homeowners will soon treat the whole process as second nature.
“Once you make the switch to an EV and get the home charging set up, it’ll really quickly become normal, just like plugging your phone in before bed,” says Sarah. “You won’t spend more time thinking about it than anything else.”
Take care of your home
Download the app today!
Homeownership can be hard, but it doesn’t have to be. The vipHome.app can help. In less than four minutes, enjoy a new way to manage your home. Simply download the app, register your home, and enjoy a simplified homeownership experience.
How do you spend your holidays? If you said “hosting family,” then you’ll need to get your home ready for your holly-est and jolliest family and friends.
Here at vipHomeLink, we want your holidays to be merry and bright. That’s why we put together a holiday hosting essentials guide to help you and your family stay safe this holiday season!
Check your smoke and carbon monoxide alarms
Every home needs working smoke and carbon monoxide detectors.
Thanksgiving and Christmas are the peak dayswhen firefighters respond to home fires, and one of the leading culprits is cooking. Before you roast chestnuts over an open fire, check your smoke and carbon monoxide alarms. (Anna Farris wishesshe did on a previous Thanksgiving.)
If you have a security system, arm it every time you leave the home, even if you’re just going out to see neighborhood holiday lights. Potential burglars arefrequent unwanted guestsduring the holiday season, so take all thenecessary safety precautions!
Serve up cooking safety – fire edition
Keep your fire extinguisher close!
While you might be tempted to get into the eggnog early when hosting guests for the holidays, hold off drinking any alcoholic beverages. Before you start, clean and declutter the area, especially of flammable items, and never leave your simmering or boiling pots unattended.
If you have a fire extinguisher, make sure that you have the appropriate type and know how to use it. If any of your appliances have been acting up,calla qualified technicianto investigate.
Serve up cooking safety – food edition
Wait for the final product!
One of the most important tips for hosting the holidays at home is to wash your hands before handling food and after handling raw meat. Use a food thermometer to ensure your dishes reach safe temperatures, and clean and sanitize utensils to prevent cross contamination. If you’re fortunate to have leftovers, follow expert safety advice, such as putting food away within two hours (one hour in areas of extreme heat).
Be bright but be safe
Use GFCIs when possible.
This is an important tip for all homeowners, not just those hosting guests for the holidays.If you have GFCIs, test them before the guests arrive (and also every month).Call a licensed electricianto investigate any issue you find, including non-working outlets and any burning smells.
When it comes toholiday decorations, use GFCIs where possible. Inspect light strings for damaged and loose bulbs, and never use nails or staples when rigging. Check manufacturer’s instructions for indoor/outdoor use and stick to the recommendations. Then turn off any decorations when you’re leaving home or going to sleep.
Keep your exits clear
We all love our candles, trees, garland, and figurines, but they can be dangerous. Keep decorations away from heat sources, such as fireplaces, portable heaters, and radiators. Also, keep all your exits – doorways and windows – clear, just in case you and your loved ones need to make a quick getaway.
Baby, it could get cold and icy outside
Be ready for snow problems.
While a “White Christmas” may be a reality for some homeowners in colder locales, winter storms can manifest in different ways – snowstorms, ice storms, hailstorms, and even harsh rainstorms. Make sure you’re ready for a potential power outage with the family, including blankets, bottles of water, games, and batteries (for flashlights and other equipment).
If you’re in an area prone tosnowstorms, get your ice melt, shovels, and other equipment in order.
Watch out for the little ones
Little reindeer like to explore!
If you’re not used to hosting younger guests for the holidays, do a safety check. Keep poinsettia and mistletoe out of reach, or even skip those decorations. Consider using LED candles instead of real ones, and handle light strings and old ornaments, which may have lead in them, with care.
Small bows can be choking hazards for pets and young children alike, so avoid placing them on low branches or on presents. Also, ensure your pets wear their ID tags, just in case an unknowing guest lets them out.
Know your local laws
More friends and family in your home generally means more cars in your driveway. Do you have enough parking? Depending on your municipality, you may need to pay extra for an on-road overnight parking permit during the winter or seek other solutions. If you live in an area with mass transit, you may have a parking garage that offers parking spots, or a traveling neighbor may even welcome cars in their driveway (if you ask). One of the best deterrents against burglary can be a car in the driveway.
Call your insurance agent
Do you have the right coverage?
Anytime you’re having house guests over for a prolonged stay, you should give your insurance agent a call. Review your current policy and see if you need additional coverage. You should also make it a new year’s resolution to spend time with your insurance agent. Your agent can update your policy with any new gifts, especially expensive ones, and help keep you protected in case of a home insurance claim.
Take pandemic precautions
Be safe while celebrating.
Discuss safety precautions for you and your guests. Depending on your locale, you may want to opt for an outdoor dinner. If you’re in the colder regions of the country, then you may choose to use exhaust fans (to pull air out of the room and not circulate it) and consider investing in portable air cleaners and heaters.
Stay on top of home maintenance
Homeownership can be hard, but it doesn’t have to be. ThevipHome.app home management appcan help. In less than four minutes, you can be introduced to a new way to home. Simply download the app, register your home, and enjoy a simplified homeownership experience.
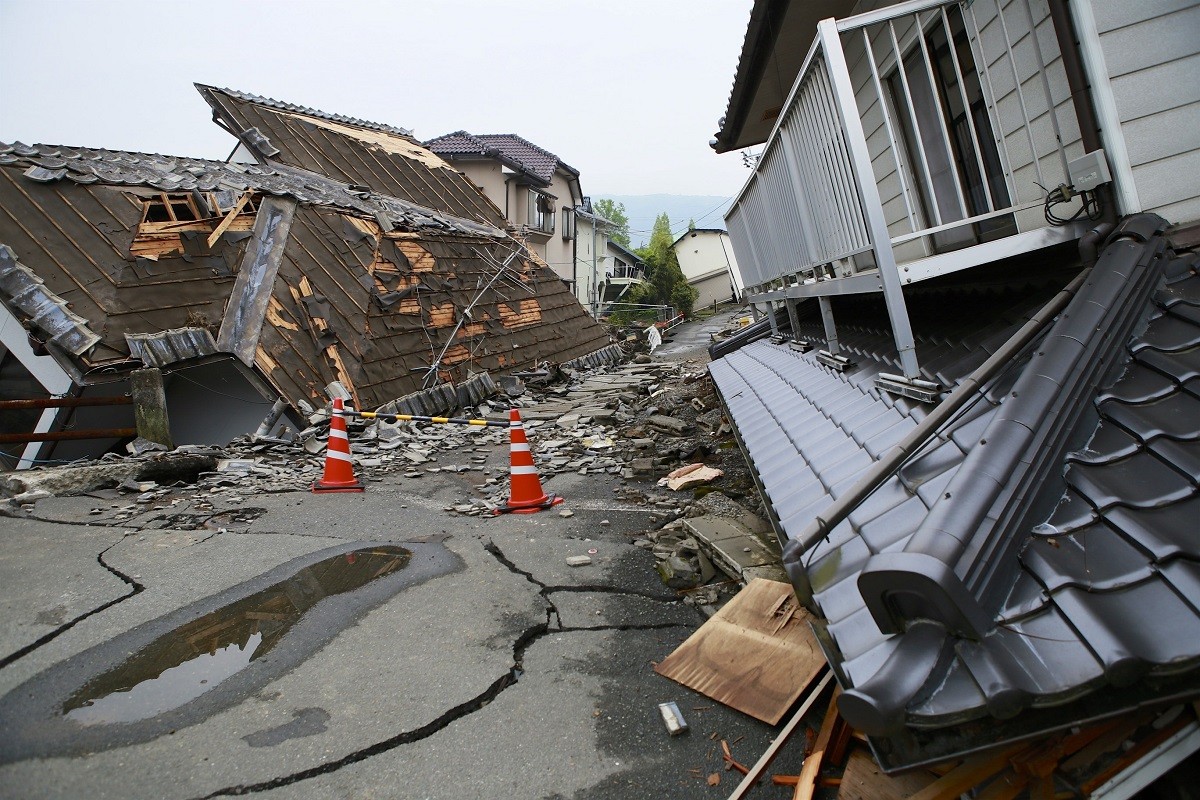
The ground thunders. Your world shakes, and your home can crumble around you. What can you do to stay safe during an earthquake?
Preparation is key. That’s why we reached out to Mike Mahoney, Senior Geophysicist, National Earthquake Hazards Reduction Program, and Pataya Scott, PhD, Civil Engineer, Earthquake and Wind Programs Branch, Federal Emergency Management Agency (FEMA). Both offered us important preparedness tips to help lower your risk of injury and home damage during a severe earthquake.
Are you in the danger zone?
While most earthquakes in the U.S. occur in California, a large part of the country is at risk.
“According to the U.S. Geological Survey, about half the states in our country can experience a damaging earthquake,” says Mike, who has been with FEMA for more than 38 years and was deployed after the 1994 Northridge earthquake in Los Angeles.
What causes earthquakes? Most earthquakes center around fault lines or the boundaries between two plates. The famous San Andreas Fault in California is the boundary between the North American Plate and the Pacific Plate, and is responsible for the severe 1906 San Francisco earthquake, the 1989 Loma Prieta earthquake, the 1994 Northridge earthquake, and the 2014 South Napa earthquake. However, the North American plate has triggered severe earthquakes outside of California as well.
“Probably the most famous ones were the 1811-1812 New Madrid earthquakes,” says Mike. “We had three magnitude 8.0-plus earthquakes in that area, which is on the border between Tennessee, Arkansas and Missouri.”
There are other faults throughout the country, including the Wasatch Fault in Salt Lake City, the Seattle Fault, and Piedmont Fault System outside of Charleston, South Carolina. There’s even a fault up in Boston.
Source: FEMA P-530, Earthquake Safety at Home
Are you in an area where a strong earthquake can occur? Check the map above to find out!
What to do before an earthquake occurs
“You can never be too prepared,” says Mike, “and we do put out some publications to help in that regard.”
“[The Earthquake Home Hazard Hunt] shows a graphic of a house and several different items that could fall over and cause damage or injury during an earthquake,” explains Mike. “We highlight those things and on the back of that chart, describes how to actually do them.”
There are a number of steps you can take to prepare your home for an earthquake; however, Mike always recommends starting with your hot water heater.
Source: FEMA P-530, Earthquake Safety at Home
“Water heaters are very tall, very narrow, very heavy, and almost always fall over in an earthquake,” says Mike. “When they do, they can rupture the water line and cause flooding in your basement. If they’re natural gas fired, they can rupture the natural gas line and create a fire hazard.”
Damaged exhaust flues for gas-fired heaters can also allow carbon monoxide to build up in the home, which can be deadly.
Source: FEMA P-530, Earthquake Safety at Home
The best way to prevent your hot water heater from becoming a hazard is to wrap metal straps around the body and top, and attach it to the wall studs with lag bolts. This can be easily and rather inexpensively done with the help of premanufactured seismic strapping kits, which you can find at your local hardware store. Gas and water appliances also require flexible connections to prevent leaks and fires during an earthquake, but a licensed plumber is recommended for this task.
Also, check to make your home is bolted to the foundation. Mike remembers the Northridge earthquake, where he saw “older homes that weren’t properly bolted literally slide off their foundations.” If your home isn’t bolted to its foundation or you can’t tell, speak with contractor who can help to properly anchor your home to its foundation.
Other parts of your home also need to be anchored, such as elevated decks, porches, trellises, and carports, as these can collapse and cause injury. Chimneys, too, can be a safety hazard during moderate or large earthquakes.
Is your chimney up to modern bracing requirements?
“I’ve seen chimneys where they collapse into the house and cause injury,” says Mike. “That was one of the most severe injuries in the Napa earthquake about eight years ago.”
If your chimney does not meet modern earthquake bracing requirements or you don’t know if it does, consult an experienced contractor to help safeguard your home from damage and your family from injury.
Quick earthquake preparedness tips
Make sure to complete these additional earthquake preparedness tips to safeguard your family and help to reduce the risk of damage to your home:
Know how and when to shut off utilities.
Ensure gas appliances have flexible connections.
Strap down televisions and other expensive or hazardous electrical components, including computers.
Secure cabinets to wall studs and use latches to keep cabinet doors from flying open during an earthquake.
Securely fasten and relocate heavy pictures and mirrors from over beds and furniture.
Secure ceiling fans and hanging lighting fixtures.
Strengthen garages that have living space above them.
Strap bookcases and shelves to walls to prevent tipping and move heavy objects to lower shelves.
Make an earthquake preparedness kit with first-aid materials, water for each person in home and non-perishable food for at least three days.
Source: FEMA 528, Earthquake Home Hazard Hunt
FEMA’s Earthquake Home Hazard Hunt also provides more information regarding these safety measures, including what you need to know before turning off your gas valve.
What to do during an earthquake
There are two common reactions to an earthquake – freezing and trying to run out of a building. The latter is one of the worst things you can do.
“Things will fall off the building as the earthquake’s happening,” says Mike. “People have been killed by that.”
That’s why you need to “Drop, Cover, and Hold.”
Source: Earthquake Country Alliance and Southern California Earthquake Center, shakeout.org
“Drop to the ground and cover your head in case something falls on it,” says Mike. “If you can get under a desk or table to protect yourself, then do that.”
These few actions can help to protect your head from falling objects. Just make sure to stay there until the shaking stops.
What to do after an earthquake
Once the shaking stops, FEMA recommends vacating the building in case it’s been damaged and could possibly collapse. Once you’re out, look at the building. If it appears to still be on its foundation and not damaged or leaning, then it may be safe to re-enter. However, don’t unless you know it’s safe.
You should also be wary of nearby structures, which may have been damaged by the intense shaking.
“Don’t just look at your immediate surroundings,” says Pataya, who has been with FEMA for more than four years. “Look at the whole area just to see if you’re safe. Even if your building performed well, a building next to you might be about to fall over onto your building.”
Once you are back inside, make sure to check your utilities and their connections.
Install flexible connections.
“Do you smell gas? If so, shut off the gas supply,” says Mike. “The electricity’s probably going to be off already anyway, but if you detect damage, then shut the electric off as well. Then just take care of yourself. Be safe.”
How long do earthquakes last?
“Generally, they’re seconds,” says Mike, “but they can, in some cases, especially with what we call subduction earthquakes that happen off the Pacific Northwest – those can go for minutes.”
Protect yourself until you feel that the shaking has stopped and be mindful of aftershocks, which are usually not as severe as the main shock.
“But they can still be severe enough to cause additional damage and injury,” warns Mike.
Make sure to not put yourself in a position where if an aftershock happens, you’re going to get injured.
Beware of secondary hazards – fire, landslides, electrocution
Source: U.S. Geological Survey, usgs.gov
One of the most frequent hazards after an earthquake is fire. Natural gas lines can break and cause significant fires. Small fires may also occur inside your home.
“The first responders and the fire department are going to be overstretched immediately,” says Mike. “If you have a small fire, it might be up to you to put it out because the fire department may not be able to respond right away.”
Landslides are another common occurrence, especially in wet environments.
“With climate change causing rain in some areas, that can actually increase the probability of a landslide happening,” says Mike.
Electrocution, too, is always a concern, so avoid down wires or broken appliances.
How to survive a disaster financially
Earthquake preparedness also includes preparing financially, so naturally, you may be wondering, “Do I need earthquake insurance?”
Since your home is one of your largest investments, you need to protect it. If you live in an area prone to earthquakes, you should consider getting this specific type of home insurance policy.
“Generally everything’s covered, as long as it’s attributable to the earthquake,” says Mike. “It’s not part of your normal homeowner’s policy and has to be a separate policy, much like flood.”
Source: U.S. Geological Survey, usgs.gov
This includes dwelling coverage and additional living expenses. It may even give you the money you need to rebuild your home.
Earthquake insurance doesn’t cover fire damage, which is usually part of a standard homeowners insurance policy; floods, even those caused by an earthquake; vehicle damage, which requires comprehensive auto insurance; and sinkhole damage.
Unfortunately, many homeowners forgo this insurance. According to FEMA, only 10% of California’s residents, 11.3% of Washington residents, and only 12.7% residents in Missouri have this insurance. These low numbers are attributed to skyrocketing premium as 60% of Missouri residents had earthquake insurance in 2000.
“Earthquake insurance can sometimes have a pretty high deductible,” says Mike.
In the event of a federal disaster declaration, homeowners may be able to receive “disaster loans,” which are low interest loans. The maximum disaster loan amount is $250,000, and average FEMA individual assistance payout is $5,000.
“That could be part of your plan as well,” says Mike. “You cover that deductible with a low interest loan and then the insurance covers the rest of it.”
There are different options, so you need to see which policies and coverages work best for your family.
Prepare and be patient
“After a large earthquake, first responders are going to be inundated, and you’re going to be on your own for days,” says Mike. “We say three days, but if it’s a large earthquake, it’s going to be longer than that.”
That’s why you need to take earthquake preparedness steps now because you’re not going to be able to do normal activities, such as running to the store for groceries. You may not even have power or communication.
Prepare your family and home for an earthquake.
“Have a plan and have an earthquake kit that’s ready,” says Mike. “Make sure it has water, food, medicine, whatever you need to survive.”
Adds Pataya, “I often hear people in California say they have tennis shoes in their cars, just in case.”
Homeownership can be hard, but it doesn’t have to be. The vipHome.app can help. In less than four minutes, enjoy a new way to manage your home. Simply download the app, register your home, and enjoy a simplified homeownership experience.
It’s fall, which means it’s officially Halloween season! Between sipping pumpkin spice lattes and going leaf peeping, you may also like to transform your house into a spooky spectacle. Of course, safety should also be top of mind when it comes to decorating and celebrating any holiday, so we reached out to our friends at Franklin Mutual Insurance (FMI) for top tips to help you enjoy a safe Halloween at home!
Tip #1 – Make your property and yard safe for trick or treaters
“The first thing that comes to mind for a safe Halloween is property and yard safety,” says Chelsea VanderGroef, Vice President, Marketing, for FMI. “You need to make sure your home is safe for guests.”
While you may want to make your home a scary sight, remember to follow these Halloween safety tips when decorating:
Keep your stairs and walking areas clear of any decorations, such as jack-o-lanterns, spiderwebs, and blow-up characters.
Beware of tripping hazards, including lights and extension cords that aren’t properly secured.
Clear your yard and walkway of leaves, which can be slippery, especially after an autumn shower.
Properly mark your pathways, so visitors know where to step.
While spooky usually means “dark,” make sure you haveproper lighting, so candy-seeking guests won’t trip or fall.
Unleveled walkways and driveways can create hazardous situations. If you have unsafe areas, call a professional to address these issues before someone gets hurt. Also, cordon off any unsafe areas of your yard and if need be, send guests to another doorway that’s safer, such as a side door. You may also want to consider sitting at the edge of your property to hand out candy.
Tip #2 – Decorate safely
Save your jack-o-lantern and home with safe lighting options.
When decorating, always err on the side of caution for a safe Halloween.
“Avoid the urge to use real flames,” says Chelsea. “Real candles can create hazardous situations in jack-o-lanterns and windows, and near curtains, costumes or flammable decorations. Instead, opt for electrical candles or glow sticks.”
Also, don’t overload outlets or extension cords as this, too, can start a fire. Of course, avoid stringing too many lights together. Always check the manufacturer’s instructions, but the general rule of the thumb is to connect no more than three strings together.
“While this may seem like a no-brainer, it’s important to note that if you’re using an extension cord or decorations outdoors, make sure everything’s rated for outdoor use,” says Chelsea. “Also, avoid a shock by pluggingany electrical decorations into a GFCI outlet.”
Tip #3 – Don’t petrify your pets
Safeguard your pets and trick-or-treaters!
“Pets, especially dogs, can be scared by children in costumes and the constant ringing of doorbells,” says Emily Notaro, Marketing & Communications Specialist at FMI. “Make sure to secure them before answering the door.”
Homeowners should place pets in a locked area, where they can’t escape while you’re giving out candy. Also, if doorbells frighten your fur-babies, then turn on soothing music or place your pet in a thundershirt, if that helps.
(“My bichon frise loved the ‘I Want It That Way!’ by the Backstreet Boys.” – vipHome.app Content Writer Susie)
Tip #4 – Keep your friends close and your smart devices on
Protect your home with smart tech!
Of course, what would Halloween be without Goosey Night, also known as Mischief Night, Cabbage Night, and other favorite terms? Today, many homeowners have at least one smart home security device, and on this night – and on Halloween night – it’s important to use them.
“If you have a security system, make sure to turn it on,” urges Emily. “Also, check that any smart home security devices, such as video doorbells and cameras, are functioning properly.”
Adds Chelsea, “It may seem simple, but make sure to turn on your lights and lock your doors.”
Tip #5 – Eat (and buy) store packaged candy
Always check your candy!
One of the most important safety tips for Halloween is – mind your candy.
“Buy and eat only the store packaged candy,” reminds Emily. “Forgo any candy apples or other homemade treats given out by strangers.”
Also, keep your candy on a high shelf or in a locked cabinet to keep your pets from finding your delicious treats.
With guests on your property, should you be worried about your liability?
Most of the common perils, including theft and liability (trips, slips, and falls) are generally covered by the typical homeowners’ insurance policy. Of course, homeowners should review their liability limits at least once a year.
“It’s always a good idea to talk to your insurance agent and see if any holiday activities pose more risk than you have coverage,” reminds Chelsea.
Happy Halloween!
Expert tips at your fingertips
Homeownership can be hard, but it doesn’t have to be. The vipHome.app can help. In less than four minutes, enjoy a new way to manage your home. Simply download the app, register your home, and enjoy a simplified homeownership experience.
Rising utility bills, rolling summer blackouts, and the drastic effects of climate change have led many to wonder, “What can I do to help lower my energy consumption at home?” You may be surprised to learn a home energy assessment can provide the answer.
A home energy assessment, AKA home energy audit or home efficiency assessment, is a comprehensive evaluation of the energy use of a home and provides recommendations to improve the home’s comfort, health, and safety.
“The assessment really helps you understand how your home is working and where its deficiencies are, as well as opportunities to save energy and money, says Steve Dunn, technology manager, Home Performance with ENERGY STAR.
We spoke with Steve and his colleague Scott Minos, who leads the Department of Energy’s Energy Saver Program. He shared what you need to know about a home energy assessment, why now is a great time to get one, and quick efficiency tips to help you jump-start your energy saving efforts at home.
When to schedule your home energy assessment
Home energy assessments are informative for homeowners of both existing homes and new construction, including ENERGY STAR certified new homes and apartments, which are independently inspected by a third-party energy rater to verify their energy performance
“For a new home, it provides you a baseline such as a Home Energy Score,” Scott said. “In existing homes, the assessments can be useful, particularly for older homes.”
“If you’re noticing rooms that are either too warm or too cold, high-energy bills, or indoor air quality issues such as high levels of dust in the home, those are all good indications that there are some issues that need to be addressed,” says Steve, who led national efforts to advance state clean energy and climate change policies and initiatives for the Environmental Protection Agency before joining DOE.
A home energy assessment can help to identify and prioritize functions that are costing you more money or creating safety issues.
“The home functions as a system, so there’s interaction between components,” says Steve. “When systems are updated or replaced or the home envelope is sealed and insulated, that could cause changes to things like moisture movement and indoor air quality.”
While a home energy assessment is not an annual need, homeowners may want to consider one if there’s a major improvement or change that could impact the performance of the home’s systems. Even homes built just a few years ago may not have the latest technology or meet the latest energy efficiency guidelines.
How to prepare for an energy assessment
Have your utility bills handy!
Prior to your appointment, homeowners should complete the following tasks:
Prepare basic information for the assessor or energy auditor, including the number of people living in the home, occupancy patterns, typical set points for the thermostat(s), and any major improvements planned.
Collect past energy bills to help the assessor benchmark and understand the historical energy consumption and types of fuels used in the home.
Create safe access points to the different areas of the homes exterior and interior, including the mechanical systems, attic, basement and/or crawl spaces, and duct registers within individual rooms.
Depending on the complexity of the home and the number of systems installed, a home energy assessment typically takes one to three hours. A larger home or a home with multiple systems will take more time.
What to expect during a home energy assessment
“The assessment starts with an interview with the homeowner, and that’ll include a discussion to identify any specific issues in the home, such as comfort or drafts, and as well as the living patterns,” says Steve.
The assessor will then review the energy bills and the fuel consumption of the home before moving onto a visual inspection. This part will include the home’s exterior, interior, insulation levels, the condition of mechanical systems, drainage and ventilation, as well as any ceiling fans and kitchen or bathroom exhaust fans, and any whole house ventilation systems that may exist.
Potential diagnostic tests
Your home will be put to the test!
The assessor may also conduct a number of diagnostic tests, including:
A blower door test, which measures the amount of air infiltration or leakage in the home.
A thermographic scan with an infrared camera, which identifies areas of air leakage, such as areas around windows and doors as well as walls, floors, attics, and other spaces.
Combustion appliance zone (CAZ) testing to ensure that appliances using gas, propane or other thermal fuels vent properly, so there isn’t any potential carbon monoxide hazards in the home.
Energy assessments can also identify potentially any safety issues in the home, such as carbon monoxide from combustion appliances, electrical hazards, and minor or major natural gas leaks in the home.
Get energy-saving tips from your accessor
Adjust your habits.
A home energy assessor not only analyzes your home systems and their functions, but also learns about the homeowners’ behaviors related to energy usage.
“The assessor will want to observe how the owners use the home, how they wash their clothes or whether they close blinds or use other window coverings, things of that nature,” says Scott. “They might have different kinds of input and advice based on just behavior.”
Some behavior-based recommendations may include washing clothes in cold water as opposed to hot or even warm water; adding window coverings to a certain part of the home; setting the thermostat at a certain degree, etc.
“This way, homeowners can understand their own energy conservation efforts and how their behavior can result in savings,” says Scott.
As a final step in a home energy audit, the assessor will use modeling software, including the DOE’s Home Energy Score tool or a third-party commercial energy software, to develop a prioritized list of recommendations for improvements. This will include any recommendations related to health, safety, and comfort, and prioritize the improvements based on the cost benefit to the homeowner.
Home energy audit cost and options
Home energy assessments generally range between $200 to $600, depending upon the specific tests completed. However, the Office of Energy Efficiency & Renewable Energy has a system that provides a home energy audit for less.
“The DOE Home Energy Score tool is on the lower end of that range,” says Steve. “It provides recommendations and typically takes less than an hour.”
EERE also recommends homeowners contact their utility companies. Some offer free home energy audits or energy assessments at a discounted rate for their customers. The recent Inflation Reduction Act provides up to $150 in tax credits for your home energy assessment. (More on that in a moment!)
Another option for homeowners is a virtual energy assessment. This type of audit is conducted remotely and in some cases with a smartphone or other device. (vipHomeLink offers a Virtual Home Checkup, which provides energy-saving tips!) In this case, the homeowner will walk around the home and highlight certain systems and areas for the assessor.
“That’s obviously not as detailed as an on-site assessment,” says Steve, “but it can help identify if there are opportunities for making energy improvements that might be supported by doing further on-site testing diagnostics.”
Take advantage of rebates and tax credits
Homeowners should look into rebates that may be available through their utility companies and the government for installations. Low-income households may qualify for assistance through the weatherization assistance program, income-qualified programs offered by their local utility, or from state and local housing agencies.
Keep your home warm and cozy.
“Some utility companies offer what’s called a direct install where they will install improvements at no cost to the homeowner,” says Steve. “This might include things like weather stripping around windows and doors, possibly installing a smart thermostat.”
“There was an existing tax credit that had a lifetime limit of $500 for home energy efficiency improvements,” explains Steve. “That’s now becoming a $1,200 annual tax credit with $150 allotted for home energy audits.”
Some homeowners can receive a 30% tax credit on eligible home improvements, including exterior doors that meet ENERGY STAR requirements; exterior windows and skylights that meet ENERGY STAR’s most efficient certification requirements; and other qualified energy equipment, such as central air conditioners, electrical panels, certain water heaters and furnaces.
Homeowners can receive tax credits for installing heat pumps!
Homeowners who install heat pumps, heat pump water heaters, biomass stoves and/or boilers, can receive up to $2,000 in tax credits, which are separate from the $1,200 annual credit.
To take advantage of rebates and tax credits, homeowners can:
Reach out to their utility companies (which may also offer financing for large home energy projects).
Explore the DSIRE website for information about financing and incentive programs for energy efficiency and renewable energy, including financing programs available by state.
Speak with their home energy assessor, who can also provide rebate options and information.
Top tips to jump-start your energy-efficiency efforts at home
EERE stresses the importance of a professional home energy audit, but there are some things homeowners can do to increase the energy efficiency and safety of the home. Scott shared with us quick ways to jump-start your energy-saving efforts!
Homeowners should make sure to use ENERGY STAR Certified LED bulbs, which use up to 90% less energy and last up to 25 times longer than traditional incandescent bulbs. Also, select ENERGY STAR Certified light fixtures, especially for outdoor fixtures with features such as automatic daylight shut-off and motion sensors. Also, make sure the home’s lighting is up to the modern electrical code and local standards.
Check insulation levels
If you have easy access to your attic, see if you have adequate levels of insulation and if the home is well insulated and sealed. (If you’re not sure about your home’s specific type or insulation levels, check out Energy Saver’s page on insulation!)
You should also check for air leaks around the usual suspects – windows, doors, and your roof.
“There’s some low-tech ways to definitely check for air leaks,” says Scott. “This can even help reduce your energy bill by 10 to even 20%.”
EERE recommends completing simple tests using a dollar bill, an incense stick, and a flashlight – not all at the same time, of course. Learn the three simple tests to detecting drafts on the Energy Saver website!
Monitor plug loads
Unplug your chargers.
Plugged-in items use 30 to 40% of the total energy consumption in the home. Even when they’re not in use, they still consume energy.
“Using power strips or other smart home devices can have a big impact on the energy bill,” says Steve.
Smart home devices and smart strips can help to resolve these standby modes,” and if homeowners forget to turn off a device, they can do so from an app on their phone.
“The whole home energy monitors are designed to connect to the electrical panel and can help identify appliances that may be operating inefficiently or help to find where the most intensive energy uses are occurring,” says Steve.
Complete proper appliance maintenance
Check your appliances and make sure they’re running well. Also, complete home maintenance tasks, such as cleaning your refrigerator coils, vacuuming your dryer exhaust vent, and changing your HVAC filters regularly. (The vipHome.app can remind you to do these energy- and money-saving tasks!)
This also includes completing your annual or bi-annual heating and cooling system maintenance as well as hot water heater maintenance.
“Both extend the life of the equipment and ensure its operating efficiently,” says Scott.
As we know here at vipHomeLink, the importance of home maintenance cannot be understated.
“Doing regular maintenance is always important as it makes sure that the house is working well,” says Steve. “This is really about home performance, and before it can perform well, it needs to be maintained.”
Join the neighborhood!
Download the app now!
Homeownership can be hard, but it doesn’t have to be. The vipHome.app can help. In less than four minutes, enjoy a new way to manage your home. Simply download the app, register your home, and enjoy a simplified homeownership experience.
Fall is prime time for completing home improvement projects. Homeowners want to get their homes ready for holiday entertaining, and fall provides mild, dry weather for home design and construction experts.
“The fall is, overall, my favorite time to build,” says Matt Kustusch ofMKA Architectural Design Group. “You’re doing the foundation work and building your shell when the weather is much more predictable. So, if you plan your work schedule accordingly, things tend to go a bit smoother.”
How can you plan your project schedule to coincide with the best conditions? Matt took us step-by-step through the fall home improvement project process!
Best projects to tackle in the fall
Pictures Courtesy of MKA Architectural Design Group
Surprisingly, fall is the best time to complete almost every particular home improvement project.
“The most important thing to remember is that the fall is the last opportunity to secure protection from harsher weather ahead,” says Matt, who has owned MKA with his wife, Kelly, since 2013, but has been designing home remodels and additions for more than 24 years.
As mentioned earlier, the weather is more predictable in the fall and usually drier than other times of the year. Coupled with the cooler temperatures in September through November, fall is a contractor’s dream season.
“It’s a great time to do rough framing; it’s a great time to pour foundations,” says Matt. “As long as the concrete is cured before a deep freeze moves into the area, you should be just fine. That’s really your only concern as far as far as the integrity of the construction is concerned.”
What projects to avoid in the fall
Beware of cold temperatures in fall!
There’s really only one project you should avoid in the fall.
“The only thing that I would consider off limits based on temperature is exterior painting,” says Matt. “You really don’t want to paint the outside of a house when it’s less than 40 degrees at night.”
The colder temperatures prevent the paint from drying properly and can lead to flaking, cracking, and peeling. In Chicago, where MKA Architectural Design Group is located, the temperatures can dip that low by late September/early October.
Certain admixtures can be blended with standard concrete which allows a pour in temperatures below freezing, but it isn’t recommended.
“If you’re concerned about any significant load coming down on a foundation, which you should be, you should fully understand the effects of those admixtures before approving a pour in mid-January,” says Matt.
Since summer seems to extend year after year, you don’t necessarily need to get your foundation poured or your house painted by a certain date.
“It’s really just dependent on how cold it really is,” says Matt.
What you need to know about planning your next home improvement project
“The timeframe has definitely changed over the course of the last few years,” says Matt.
Only a few years ago, three months was a good amount of preparation time. Unfortunately, projects could now take four to five months due to delays associated with the permit application process and high demand for design and construction services.
“Based on the recent demand, I’m seeing projects where the design process may start as early as March, for example, and those projects are just now (late August/early September) being approved for permit.”
Not sure how to start your home improvement project? Matt walked us through his four-phased design construction preparation process.
Phase 1: Meet the clients
Matt starts by meeting with the clients to get a general idea of their goals. He visits the site with the potential client and tries to define “needs” and “wants.”
Original Kitchen, Courtesy of MKA Architectural Design Group
“If it’s a proposed new construction, I want to understand the site and learn as much as I can about the future occupants…how they live and, more importantly, how the house can make their lives easier,” says Matt. “If it’s a remodeling project, I want to understand how the existing home was built, so I can find the most efficient way to achieve the same goals.”
Once Matt’s proposal is accepted, he meets with a client to discuss any rules that govern what’s possible. There could be limitations based on zoning restrictions, budget, or existing conditions that must remain intact.
Once the boundaries are set, the program is further examined to determine more specific objectives. Explains Matt, “I’ll look at the project goals more closely. How much space can we add? Where do we add it? If you want a bedroom, what do you want in it? What size bed? Do you need a desk area?”
This phase helps Matt get a better understanding of a client’s expectations which drives initial conceptualization and cost analysis.
“Sometimes a client’s expectations are unrealistic, so I like to get the sticker shock out of the way as early as possible,” says Matt. “Things cost up to 20% more than they did a few years ago.”
Phase 2: Choose the right path
Once the assessment phase is complete, Matt and the clients move into the schematic design phase where multiple ideas can be considered without significant investment.
“We may come up with multiple concepts and discuss their advantages or disadvantages. It’s important to show a homeowner a number of options to choose from to find the right path,” says Matt.
The path, however, doesn’t have to be perfectly defined.
“When you’re on a hike in the middle of a forest, you can vary from the defined path but still be going in the right direction to reach your destination. You never know, you may discover a perfect view that you wouldn’t have even known was there,” says Matt.
Phase 3: Design development
Courtesy of MKA Architectural Design Group
Once the clients choose their path, the architectural process moves into design development. Here, Matt takes the preliminary sketches and refines them using computer aided drafting (CAD).
“We really look at the specifics associated with square footage, structure, construction methods and how we’re going to be integrating various systems like plumbing, electric, and HVAC,” says Matt. “That really gives us a much clearer picture of what it’s going to take to do what we want to do.”
This is also the phase where Matt determines a more accurate project cost. If the homeowner is comfortable with the design and the cost, then the process moves forward into the final phase, construction document preparation.
Phrase 4: Construction document preparation and permit application
Now, Matt completes the actual drawings that will be submitted for permit(s).
“The municipality has to review the drawings we prepare and approve the application for the permit before we can start construction,” says Matt.
As you can tell just from this section, the entire planning process takes time.
“Managing a client’s expectations of time required for design is something we try to do upfront as well,” says Matt.
Courtesy of MKA Architectural Design Group
Tips for choosing a home professional from a home professional
Matt always recommends that potential clients speak to a number of design professionals.
“I want them to understand that everyone has varied opinions, different backgrounds and preferences based on past experiences or exposure to another’s work,” says Matt. “Home construction is such a massive investment. In some cases, the largest in a client’s life. Well, maybe not as much as college these days.”
It’s also important to find someone you trust and align with from a design perspective.
“Look at current examples of what they’ve done, and picture yourself in those spaces,” says Matt. “If you feel like you would be comfortable – well, that’s a good thing…keep exploring.”
A key aspect to look for in any design specialist is professionalism.
“A client shouldn’t be sold on an idea or told what to do,” says Matt. “I won’t just tell a client what they want to hear. I’ll tell them the truth and give them my opinion based on years of experience and my interpretation of the issue at hand.”
Hiring a design professional who agrees with everything you say may not lead to a successful project.
Explains Matt, “It’s my job to show a client what’s possible. It’s my job to accomplish their goals and satisfy their needs in a way that they may not have already seen in some magazine.”
Finally, understand the reason there’s a cost differences between design professionals.
“Finding a design professional is the same as finding any service provider – you get what you pay for,” says Matt.
It’s imperative to understand costs upfront, including what’s included in the proposal and how you’re being charged – by the hour, by square foot or is it a flat fee?
Does your home improvement project need an architect?
While not every project may need an architect, there are a few situations where you absolutely do.
Explains Matt, “I would say, from a legal perspective, whenever any structural condition is altered or a type of electrical device, plumbing fixture or heating and air conditioning element is modified – that’s the moment you really should contact an architect.”
Matt continued, “If those elements aren’t moving, you could probably visit a Kitchen and Bath Design Shop and replace the cabinets, sinks and countertops yourself if you want to.”
“In most cases,” Matt added, “It shouldn’t cost anything, so you might as well have an initial conversation with an architect.”
What fall home improvement projects are hot right now
Pictures Courtesy of MKA Architectural Design Group
Matt has seen an increase inoutdoor living space projects.
“I have seen an increased demand to extend the use of outdoor spaces,” says Matt. “I’ll get inquiries regarding screen porches and three-season rooms every week.”
Three-season roomstypically lack insulation for windows and can be used in spring, summer, and fall.
“With the new technology such as infrared or the hydronic in-floor heat, you can keep those spaces relatively warm,” says Matt, “so you can use them as early as March and all the way through the end of November, maybe even December.”
Expert tips at your fingertips
Homeownership can be hard, but it doesn’t have to be. The vipHome.app can help. In less than four minutes, enjoy a new way to manage your home. Simply download the app, register your home, and enjoy a simplified homeownership experience.
Last October, one of our team members returned home from a vacation to find three inches of water in her basement. Unfortunately, her water heater, dryer, washer, and mini fridge all received a not-so-clean bath, but she was fortunate that the flood didn’t create additional hazards.
“During flooding situations, gas appliances may be stirred, shifted or broken away from the supply line, causing a dangerous gas leak situation,” says Paul Pirro, Manager Technical Support – Appliance Service, Gas Asset Strategy – at PSE&G. “Plus, any electric appliance or equipment can also shift or experience a pull on the connection or cord, causing an electric short-circuit or sparking.”
While flooding itself may not be preventable, Paul shared with us appliance safety tips to help you prevent storm damage and lower your risk of a home fire or worse!
Before a severe storm hits your area
One of the first steps to preventing a hazardous situation is to turn off the gas to appliances.
“During an emergency storm situation, it may not be possible to get immediate assistance,” says Paul, who has been in the utility industry for more than 40 years and recently received the American Gas Association’s Diamond Award of Merit. “Having shut-off valves in good-working condition would be recommended and preemptive.”
Shut off your appliance gas valves.
Newer gas valve shut-offs are easily turned by hand, but older valves may require tools to operate. If you have any questions, always contact a professional.
When it comes to electrical appliances, all non-essential appliances and equipment should be unplugged, shut off, and secured.
“Electric appliances especially can experience a surge once PSE&G turns on the electric after it’s off,” says Paul. “Even if an appliance is off, but it’s still plugged in, it can still experience a surge and possibly get damaged.”
If you live in an area prone to floods and storm damage, consider moving any appliances or equipment to higher levels of your home.
“Unfortunate folks who have experienced more than one flood event tend to move a lot of their appliances to a second floor,” says Paul. “A preemptive installation for this equipment to a higher elevation should be performed by a professional who is trained and qualified.”
What to do in the event of evacuation
You want to leave your home as safe as it can be. Therefore, it’s important to shut down or disconnect any unnecessary equipment or appliances that may get damaged.
As mentioned earlier,gas valves supplying individual appliances should be shut off if severe flooding is expected. Also, all exposed electrical connections should be unplugged or disconnected to prevent electrical shorting and damage.
In the event of evacuation, you can shut off the gas valve at the meter to minimize the chances of gas leaks occurring inside the home. Paul provides these quick steps:
First, locate the gas meter inside or outside of their home. The inlet pipe should be next to it. (See diagram on PSEG website.)
Turn the gas off at the main shut-off valve on the inlet pipe by using a 12-inch adjustable wrench or another suitable tool.
Turn the valve a quarter (1/4) turn in either direction until the valve is crosswise (perpendicular) to the pipe.
Courtesy of PSE&G
Also, secure furniture, boxes, and any potential clutter away from doorways and windows that could prevent access to appliances if rooms become flooded.
Dealing with home floods and electrical hazards
Your home flooded. Now what?
Your safety is first and foremost when it comes to dealing with floodwater. Never step into a flooded basement or any other room.
“Floodwater may be in contact with electrical outlets, appliances, or cords,” says Paul. “The water could be energized, causing shock or electrocution.”
Don’t touch appliances if they are surrounded by water and stay away from the breaker box in a flooded basement. The breaker box contains significant electricity for the whole house.
Once the floor is dry and no flood water is touching appliances or outlets, if possible, unplug or shut off all flooded equipment before electricity is restored.
“If it can be done safely, homeowners can turn off air conditioners or major appliances that may have been running when the outage occurred,” says Paul. “This will help avoid a sudden surge of power when electric service is restored.”
If your power is “on” after a flood event
There is a possibility of electric shock or electric short circuit, which can cause a fire. If the electric panel was affected by flooding, it must be inspected by a municipal inspector. Then it must be repaired, re-inspected, and turned on before gas service can be restored. (Municipal inspection rules vary so check with your town for precise instructions.)
“The key item is floodwater must be cleared before that inspection is performed,” says Paul. “Municipal employees will not perform this service if floodwater is still on the floor.”
If power is “off” after a flood event
The electric panel must be inspected by a municipal inspector before the power is restored. Once again, floodwater must be cleared for that inspection before gas service can be restored.
“We try to make it clear to customers that all electric issues have to be removed before we can consider introducing gas back to the home,” says Paul.
How to clear floodwater
How do you begin to deal with this?
Since floodwater needs to be cleared in order to get service reconnected, how does a homeowner get the water out of their home?
“Sometimes the municipality, including the fire department and others, can help,” says Paul, “but homeowners have to be careful. If they take too much floodwater out, it can affect the foundation of the home.”
Some experts suggest pumping out a third of the floodwater each day for three days.
“If there’s water outside the home and inside – if there’s an inequality of pressures, the foundation can collapse,” warns Paul. “Also, just floodwater itself can affect the foundation.”
Appliance safety after a flood
Appliances do not tread water well.
Appliances that have been exposed to water can short out and become a fire hazard. A trained service professional can determine how high the water level mark reached and identify any specific appliance hazards.
“Rusting of ground connections and pitting of wiring harnesses and connections can cause exposure to electric shock and malfunctioning of the appliance,” says Paul.
You should replace your appliances or have them inspected before attempting to use them. Contact your the manufacturer(s) of your appliances for inspection and further instructions.
Listening to professionals is important as even appliances that work now can create hazardous situations in the future.
“Heating controls exposed to floodwater can fail even though they tested OK after being dried and placed back in operation,” says Paul. “This is especially true for electromechanical components that may short out or fail after internal corrosion develops.”
That’s why any controls exposed to floodwater must always be replaced.
Beware of mold.
All newer appliances contain circuit boards and electrical components that get damaged easily by coming in contact with floodwater. They would need replacement if flooded or exposed to surges.
Gas-fire equipment contains safety controls that, after being exposed to floodwater, can potentially create an overheating or fire condition.
“PSE&G will not restore gas to water heaters with controls that have been affected by floodwater,” says Paul. “Flooded units must be replaced, and every water heater manufacturer makes this point.”
Since the 90’s, the technology of water heaters has changed, and now all components are together tied to the gas valve.
“There’s really no way of resurrecting it,” says Paul.
Anything that came in contact with floodwater may have also been exposed to stored chemicals, raw sewage, and other unknown contaminants. Mold can grow on any surface that was exposed to floodwater.
“Homeowners should also be aware of health-related risks that are associated with floodwater,” says Paul. “If a refrigerator is off and has been affected by flooding, there’s a possibility of getting mold inside the refrigerator and freezer. In that case, the homeowners may not want to use that again.”
PSE&G provides customers with detailed guidance on how to deal with flooding or other safety related emergencies at www.pseg.com
A better way to manage your home
Download the app now!
Homeownership can be hard, but it doesn’t have to be. vipHome.app can help. In less than four minutes, you can be introduced to a new way to home. Simply download the app, register your home, and enjoy a simplified homeownership experience.
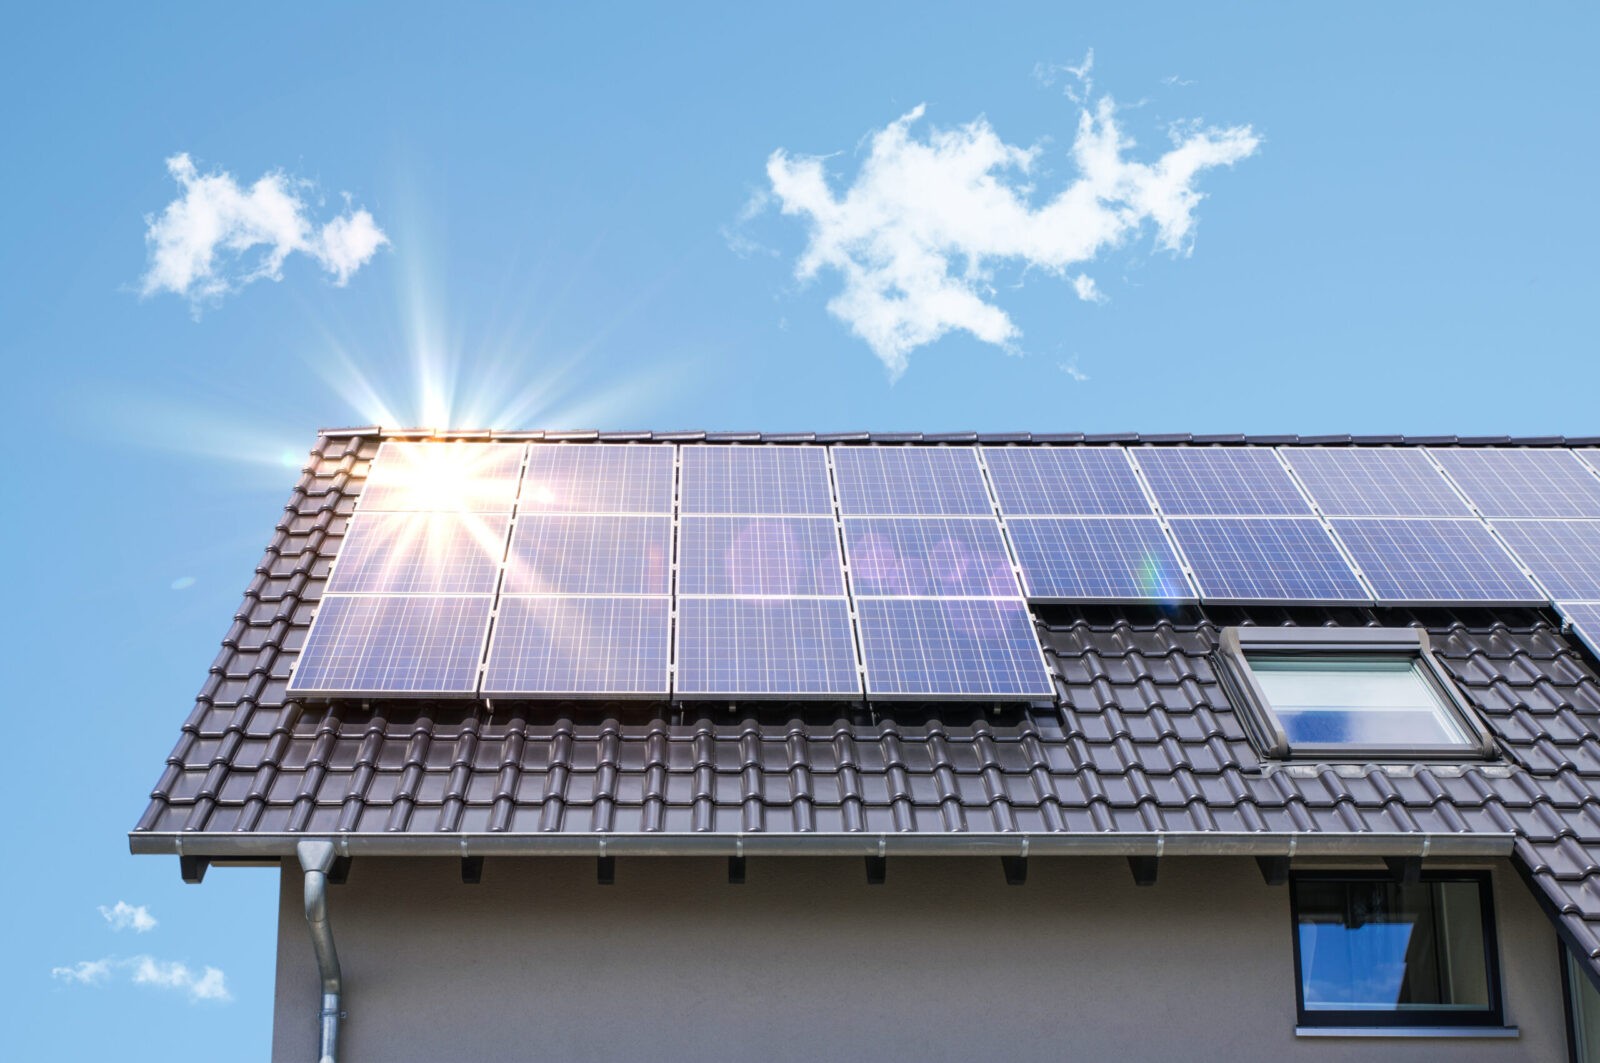
In 2020, solar energy accounted for 3% of the U.S. electricity generation. The U.S. Energy Information Administration projects that it will account for 5% of U.S. electricity generation in 2022 and as much as 20% by 2050. If you’re like us and interested in helping to increase solar generation, then you probably have a one hundred and one questions.
That’s why we reached out to Shyam Mehta, Assistant Director, Distributed Energy Resources at New York State Energy Research & Development Authority (NYSERDA). Shyam has been part of the solar industry for more than 13 years and answered 12 frequently asked questions to help you decide if solar panels are right for your home.
#1 – What actually is solar energy?
Energy comes from the sun in two forms – heat and light. Solar panels on homes receive light energy or photonic energy that they then convert into electric energy.
“Basically when we say ‘solar energy,’ we really mean what’s called ‘photovoltaic energy,’” says Shyam, “which solar panels can convert into electric energy for residential, commercial, industrial, or other applications.”
Thus, solar panels absorb sunlight and convert it into electric energy for use by the home for specific appliances. For homeowners, solar panels on their home can generate more than just energy; they can generate savings, too.
“These solar energy systems are typically designed to offset all or most of the annual electric consumption of a household,” says Shyam.
If solar panels on a home produce extra energy, that energy is exported to ‘the grid” to be used by neighboring homes or other consumers.
#2 – How do you know if your home is suitable for solar panels?
Is your home facing the right way?
The ideal roof will have a large, shade-free section that faces either south, southeast, or southwest.
“Because of our location in the Northern Hemisphere, south-facing roofs get maximum exposure to the sun,” says Shyam.
Homes with east- or west-facing roofs can receive solar panels, and some homes even get solar racking on the ground, though that is rare. Since home solar panels are generally mounted on metal racking, which is securely fastened or bolted to the framing of the roof, the status of your roof is important.
“Before the installation, the solar installation company will look at the roof,” says Shyam. “You don’t need to have a brand-new roof, but it’s not uncommon for a roof to be replaced before solar panel installation.”
#3 – Do solar panels increase home value?
A 2015 U.S. Department of Energy study says yes! The team analyzed more than 22,000 homes sales across eight states from 1999 to 2013 and found that homebuyers were willing to pay more for homes with solar panels. In fact, the study found homebuyers generally were willing to pay $15,000 more!
#4 – How easy is the solar panel installation process?
Get solar panels on your home in a few easy steps.
Once you decide to get solar panels, the process is fairly straightforward.
First, you’ll need to reach out to solar panel installation companies in your area. The installation companies will provide price quotes and system designs. A professional may also come out to the house to take measurements of the roof and the solar resource.
“The homeowner then enters into a contract with an installation company,” says Shyam.
The installation company will apply for governmental approvals, such as building permits and the interconnection approval from the utility company. (The interconnection approval is a contract between the utility company and customer regarding the operation of the home solar system.) The installation company will also apply for incentives or loans that may be available in your area. This process generally takes one to two months.
Once approvals are secure, your installation company will schedule the solar panel installation.The physical installation of the equipment typically takes one to two days.
Following installation, the utility company will inspect the system and then issue permission for the system to be turned on.
“This is called ‘energizing the system,’ at which point the system begins producing electricity,” says Shyam.
#5 – How do you choose the right installer or contractor for your home?
“We list installers that have we have inspected to have consistently high-quality installation standards and accredit them with what we call ‘a Quality Solar Installer designation.’”
Check if your state offers a similar site and use all available resources to cross-check potential installers and get a sense of their quality accreditation.
Then, of course, read the contracts carefully before signing.
#6 – How much do residential solar panels cost?
Unfortunately, there’s no bottom-line number when it comes to installing solar panels as there are so many variables.
“The cost varies a lot by the size of your system, which is a function of the size of your roof,” says Shyam. “It depends on where you are in the state, whether you are in the upstate region, Long Island, or New York City. Then it also depends on what kind of loans or rebates you are eligible for.”
Many states and utility companies offer grants and rebates to homeowners that reduce the out-of-pocket cost of home solar panels. The federal government also offers a tax credit that equals 26% of the system cost. Depending on where you live, most cities also offer property tax abatements and other credits. Typically, all these incentives total several thousand dollars.
“On top of that, most solar installers offer loan options or even lease options where you pay a monthly lease instead of paying for the entire cost of the system upfront,” says Shyam.
All these options help to bring down that initial, upfront cost, so how can you take advantage of these offers?
“Typically the installer or the contractor handles all of that for the homeowner,” says Shyam. “Once you are in a contract with an installer, they will apply for the NYSERDA incentive, the federal tax credit, the state tax credit, etc.”
#7 – Is solar worth it for your home?
Solar panels can help in a variety of ways!
Having solar on your home doesn’t just reduce your electric consumption: any excess electricity the system produces also results in bill savings. For each unit of solar power exported by the homeowner’s system, the home’s electric bill is reduced accordingly.
“We call this net energy metering or net metering,” says Shyam. “Basically anything your system generates over and above what it produces for your home usage offsets your electric bill, and that’s how you get compensated.”
#8 – Do you need to worry about any electrical fields and your home?
“These claims of electrical fields are really not merited,” says Shyam. “There’s no evidence to suggest that solar panels create any kind of electromagnetic fields or electric fields are dangerous to human health.”
#9 – Once installation is complete, do you need to complete any maintenance?
“In general, you do have dust accumulation on the solar system in dryer climates,” says Shyam. “In New York, just given the frequency of rainfall that we have, that tends to not be an issue.”
If you’re in a dryer climate, you may have to clean the panels with a simple garden hose and water. (If you’re uncomfortable doing this, talk to your installer about a maintenance plan.)
Solar panels are low maintenance.
There is one part of the system that will need to be replaced – the inverter.
Explains Shyam, “That’s the part of the solar system that converts the solar electricity, which is DC, or direct current power, to AC, or alternating current power and the form of electricity that is used by most household appliances.”
The inverter typically needs to be replaced after 10 to 15 years, about midway through the life of the system.
#10 – What if my solar panels are damaged?
You don’t need to worry too much about physical damage to your panels, though it’s important to be mindful of severe weather events.
“[Solar panels] are pretty resistant to hail,” says Shyam, “but in extreme weather, like a hurricane, they can be damaged or displaced.”
Shyam recommends that homeowners discuss potential damage with their installer prior to signing the contract.
“It’s important to establish who’s responsible in the event of damage to the system,” says Shyam. “NYSERDA requires that installers offer at least a five-year warranty.”
You should also contact your insurance company to discuss additional coverage for your property.
“A homeowner’s insurance may cover certain types of damage, such as falling tree limbs, for example.”
#11 – How long do solar panels last?
The lifespan of solar panels and system is at least 20 to 25 years.
“The solar panel manufacturers also offer a production warranty that lasts for 25 years,” says Shyam. “However, it’s not uncommon that a system can continue producing energy well beyond that period.”
#12 – What if solar panels aren’t right for your home?
Consider community solar options!
If for whatever reason – financial, technical, or ownership-related – you are unable to install rooftop solar panels on your home, then you may want to consider community solar options.
“This model has gained a lot of steam, not just in New York, but across the country over the last four to five years,” says Shyam.
(New York currently has the largest community solar market in the nation.)
Subscribers pay for a portion of the output in exchange for a discounted rate on the energy that is produced by the system, which is typically located off-site, but in the surrounding community.
“It’s generally located in the same utility territory as where you live, but it’s not necessarily next door or in your backyard.”
If you’re interested in solar panel communities, check your utility company’s website or reach out to your state’s energy department.
Homeownership can be hard, but it doesn’t have to be. The vipHome.app can help. In less than four minutes, enjoy a new way to manage your home. Simply download the app, register your home, and enjoy a simplified homeownership experience.