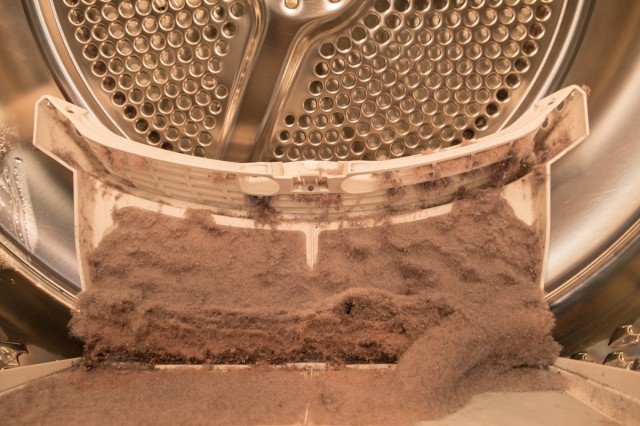
Your dirty dryer is more dangerous than it looks. Each year, more than 2,900 clothes dryer fires lead to an average of 5 deaths, 100 injuries, and more than $35 million in property loss.
As if the fear of a home fire wasn’t enough, a dirty dryer vent can increase your gas or electricity costs and damage your dryer’s heating element (as well as your favorite pair of jeans).
So keep your home intact and your clothes smelling springtime fresh with this quick guide to dryer vent cleaning!
How do you know you need to clean out your dryer?
There are a few surefire ways you know it’s time to clean your dryer. Some red flags include:
- A longer drying time than usual.
- Lint everywhere – on your clothes, around the doorway, behind your dyer.
- An overheating dryer that shuts off regularly.
- A moldy smell on your clothes and in your dryer.
- Hotter than usual clothes or dryer at the end of a normal drying cycle.
- A lack of lint or lint on the wrong side of the filter.
- A burning smell in the laundry room.
- Pet hair on clothing after a drying cycle (if you have a pet).
If you notice any of these signs, either clean your dryer vent or call professional dryer vent cleaning services.
How often should a dryer duct vent be cleaned?
Optimally, once a year. However, if you notice any warning signs, you might need to clean the unit more frequently (or do a deeper clean).
If you keep forgetting to clean your clogged dryer vent, the vipHome.app can help! We’ll send you personalized reminders for home maintenance and tailored recommendations for home improvement right to your phone. As a member, you’ll receive a reminder to clean out your dryer vent the same time next year!
How much does a dryer vent cleaning cost?
According to HomeAdvisor, a typical dryer cleaning will cost between $100 – $169, with an average of $132. High-end job can run as much as $300 – if your dryer is located far from an exterior wall.
What if you want to tackle a DIY dryer vent cleaning?
Typically, a DIY dryer vent cleaning is an easy home maintenance project. In fact, your local home improvement store sells dryer vent cleaning kits and brushes to make the job easier.
We do urge you to hire a dryer vent cleaning professional if you’re not familiar with your unit, and never clean your vent if you have a rooftop vent. Safety first!
But if you’re ready to tackle this home project –
Here’s a quick step-by-step guide!
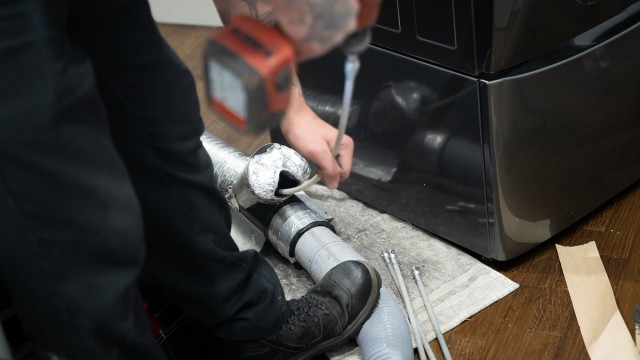
- First, gather your tools for the project: a screwdriver, a vacuum, an extendable flexible brush, and a broom. If you brought a vent cleaning kit with a hose attachment, grab that now, too.
- Second, find the vent (it should be on the back of your dryer) and the exhaust vent (where the dryer vent exits your home).
- Next, unplug the dryer (make sure it’s off first), and if you’re working with a gas dryer, turn off the valve.
- Then, move the dryer away from the wall and disconnect the dryer duct. (Use the screwdriver to loosen the hose clamp if need be.)
- Now, remove the dryer lint. You can do this by hand (with proper safety gloves), but you’ll also need to use a vacuum (or shop vac) to capture the lint you can’t reach.
- You can also detach the vent where it meets the wall, and don’t forget to head outside. There, you’ll need to detach the vent cover and vacuum the excess lint. Be aware that rodents and birds like to use lint to form nests, so you might end up finding more than just lint.
- Rotate your dryer vent cleaning brush inside the vent and/or duct to remove as much lint as possible. Do a thorough job, or you’ll need to do this again in a few months or even create a fire hazard.
- Clean around the dryer’s floor and wall to remove remnants. If you leave any lint around the back of the dryer, it’ll be sucked back inside the dryer once you restart it.
- When cleaning is complete, check for any damage to ducts. If the duct looks in good condition, reconnect.
- Move the dryer back into place, then plug in the dryer, and if need be, turn the gas back on.
- Test-run an air fluff cycle to check that the dryer is functioning properly and clear any residual matter.
And you’re done! Congratulations on finishing another DIY home project!
Stop lint in the first place
While you’ll still need to complete this home project yearly, you’ll want to stop lint buildup in the first place. This will not only make your cleanup job easier; it’ll also up your efficiency, keep your utility bills low, and prolong the life of your unit.
So don’t forget to complete the following maintenance tasks regularly:
- Clean your lint trap after every cycle.
- Clean your filters to the point where water can easily flow through.
- Sweep the area around your dryer.
- Remove the lint trap and vacuum around the area on a weekly or monthly basis (depending upon how often you use your dryer).
Stay on top of home maintenance
Homeownership can be hard, but it doesn’t have to be. The vipHome.app can help. In less than four minutes, enjoy a new way to manage your home. Simply download the app, register your home, and enjoy a simplified homeownership experience.
Download the app today!